Pages

13 August, 2010

Makeup - Eye Shadow Primer

I felt guilty for not updating my blog so I thought I share a quick review on two different eyes shadow primers I have used over the years. Just as reference, I tend to read reviews on www.makeupalley.com prior to purchasing many of my makeup items, you may want to consider doing the same!

My skin type is typically pretty oily and predominantly in my T-Zone area. I have tried two different type of eye shadow primer, Urban Decay Primer Potion and Two Face Shadow Insurance (I recommend stocking up during the family and friends event of Sephora or Urban Decay!).


Pros: It lasts all day, give extra boost pigment to your shadows (high end or low end brand), no weird casting to your eyes if worn alone.

Cons: Packaging isn't the greatest, too much product applied will make it hard to blend.

In technicality, I would rate this product a 9.5.  A little goes a long way.  I recommend depot-ting this product when you think you are running out. There are a lot more products in there than you think. Retails for $18 dollars on Sephora right now for the original primer. 


Pros: Blends well, lasts for a good 6-8 hours of the day, good packing, no weird casting if worn alone.

Cons: Doesn't last as long as Urban Decay Primer Potion, doesn't give eye shadows that extra pop of color.

I tried this out on a whim since I've heard good reviews about it. I think its good for every day wear to prevent eyeshadow smudging. At the end of my 10 hour work day, I do notice slight smudging and it would be the major con of this product. Again, a little goes a long way and this product retails for $18 on Sephora.

Overall, I would recommend the Urban Decay over the Two Face Shadow Insurance. I've recommended to many of my family and friends and yet to hear complaints. Depending on your skin type, you can choose the best product that works for you skin. 

10 May, 2010

Eyelashes - Careprost Update

Here for a quick update. I promise to upload some results of my lash growth. I am still using my first bottle and still pretty consistent with the application but after 9 weeks of usage, it appears the product is no longer working on my lashes.  I will continue to use the product and hopefully something will trigger the eyelashes growth again. For now, check out my lashes. Left was taken first week of March, right, taken last week of April.  I will keep updating  if things changes. Toodles~~


March 06,  2010                                                              April 24, 2010

03 May, 2010

Makeup - Gel Eyeliner Recommendation

I decided to write a review on gel eyeliners. Through the years, I've had my share fair of eyeliners. It's a necessity in my makeup book. When I first started wearing makeup, my first eye liner was a pencil. Gradually, I transitioned to liquid eyeliner, and eventually, I made the jump to gel liners. I highly recommend using a gel liner if you like to line your eyes. The staying power of gel liners definitely outlast pencils and liquid liner. Forget the smears, tears, and rubbing, just join the band wagon.


My first gel liner was the famous Fluidline in Blacktrack by MAC.  The staying power was great. The consistency is very smooth and goes on dark. With all gel liners, I recommend using an eyeliner angle brush for application. Although the staying power of this product was great, I felt that the product dried up to quickly. Product did not last longer than 3 months. Highly disappointed for a product that cost $15.

The second gel liner I had preivous used is the L'Oreal HIP Liner.  The color pigment was not as dark as the MAC fluidline but the texture was very similar. This product is comparable to MAC fluidline but for the price of $10-$12, I don't think its worth it. Over a short period of time, this product too tends to dry out and begins to flake during the course of the day. I would get bits and pieces in my eyes and being a contact wearer, it eventually became a pain so I ditched this product after a few months. 

My current favorite gel liner is a drugstore brand that deserves a praise. It is my Holy Grail eyeliner made by Wet n' Wild. Sounds too good to be true right?  I've read some reviews on this liner and most were positive reviews.  For the price of $4, it was worth a try. It wasn't like i was losing much money if the product didn't work out. The eyeliner has a really smooth consistency. Almost too smooth to be true. It glides on like a dream and the color is a really pigmented black.  Compare to the MAC Fluidline, I would say Wet n' Wild would outlast MAC Fluidline any day. I haven't had a problem of smudging, drying, or flaking since I been using this product for the last month. Check out the image below. This is after a 10 hour day of makeup. You can see how oily my forhead is but my eyeliner is still dark and smudge free! 


With any product, i recommend reading reviews on them before you purchase them. Remember, its always a smart investment to purchase good bristle brushes for your eyes and skin AND don't tug on your eyes when applying eye makeup, it causes premature sagging and you know us ladies don't want that! Toodles ~

21 April, 2010

DIY - Raised Garden Bed

Ahhh,...a hope of summer have made it to the Midwest. I have been itching to start a garden for quite some time now. Finally, the Mr. agreed but with one stipulation, It.had.to.be.a.raised.garden. He's not too fond of digging up the backyard for my project since I've never gardened before. I wouldn't either, who knows how long my garden enthusiasm will last! After some initial research, the Mr. realized that non-treated wood would be too costly to build a raised bed. We were out shopping one day and saw a starter kit at Menards while walking through their lawn section and it was reasonable priced for under $40 so we snatched it up and started on this project as soon as we got home.

Garden Kit from Menards

The perk to using this is that you can easily buy another kit and add on to your current garden. For a household the size of mine, I don't expect that I will need to grow that many vegetables. Opening this kit I realized the frame is made of plastic. Boo! I preferred for it to be wood but oh well. Moving on. To prep the garden bed, we had to turn over the grass. Mr. thought he was free from digging but he was so wrong!
Measure the perimeter and start digging away!


Turn the grass over and level out the bed and frame.

We purchased about 6 bags of soil. It was recommended 7 cubic feet for this bed but once we started filling, we realized we only needed 4 bags.

Fill up the bed and level out the soil

The last step is to plant your seeds!  I tried to pick vegetables that would be eaten in my household and the quickest to grow. Did you know it takes 90 days before some vegetables can be harvest?!? I wanted to grow those miniature watermelon but the Mr. vetoed that idea. He said they take up too much space. Oh well, I'll make due with what I can for my first garden. 

Top Left to Right: Cilantro, Baby Spinach, Radish
Bottom: Mixed Lettuce Bunch

It's been a little over 10 days since I started this project and I can see the vegetables growing. Follow along and see how my first garden turn out. I know I have a lot of projects going on at once but I promise to have updates soon.

On another note, I have booked my vacations for the month of May. I will be visiting Hawaii, California, and Florida all in one Itinerary. I will update my blog with my experiences once I get back!

09 April, 2010

DIY - The Convertible Infinity Dress

I haven't sewn for awhile and was having the itchy fingers to start making something. Some of the blogs I frequent were discussing this infinity dress that can be worn a million different ways (Over exaggerating again). I was curious so I started following some of the links which have me ending up on the original blogger and tutorial of this dress: http://rowena.typepad.com/rostitchery/infinity-dress.html.  Her instructions are pretty easy and her mocks up seems reasonable to follow. Besides, it is made of knit jersey and claims to take only 1-2 hours. I can do that. Yes. I can.

Before I set out to tackle this dress, I googled the web to see if others have attempted this dress. Behold, the 139 pages forum dated back to 2006: http://www.craftster.org/forum/index.php?topic=104089.0.  After skimming through the first 40 pages or so, I set out to make this dress.

First stop was Joann's fabric. I found myself a knit jersey fabric in dark blue. I considered using a black knit since black is so forgiving on everyone but I quickly change my mind since I already own a lot of black dresses.  At $3.99 a yard, a little over 3 yards (took the remaining of the bolt), and a 40% coupon found in their ads available at the front entrance, I paid about $6.50 for this project. Sounds like a steal for a quick project I would say!

Following the instructions in the original tutorial, I cut out the circle skirt that measured about 22 in. long, waist band about 4 in. wide and 30 in. long, and the straps which was 8.5 in. wide and 70 in. long. I didn't think I would need straps longer than that since I was afraid all that extra fabric would make the dress look bulky. I've encountered some issues during the process of this project and are sharing it with you all in case you want to try making this dress.


Lessons learned:
  • Consider the stretch of the fabric - I cut the circle skirt based on the measurement of my waist / divide by 3.14 / and divide that by 2 but the knit fabric end up stretching and making the circle to big.  I recommend cutting a smaller circle and see if it would fit over your wasit. If it doesn't, you can slowly cut and make a bigger circle.
  •  Actual Fullness of the skirt - After trying on the dress, I felt the fullness of the circle skirt made me look bigger and or how the man of the house said it,  I look pregnant. If I decide to make another dress like this, I would consider using a half circle skirt or an a-line skirt to slim down the volume of the dress. 
Saving the best for last, pictures of the final product and some of the different styles I thought was wearable for my body type. 
Straps & Knots

Up Close


Tube Top Style


You probably wouldn't believe how much these dresses are running for in retail stores. I provided some links to these retail dresses for your viewing pleasure.

Victoria Secrets: Flirty Convertible Dress
Two Birds Bridesmaid: The Dress

21 March, 2010

Did my lashes grow?

I'm finally back to give you an update on the growth of my eyelashes and the use of Careprost!  It's been a long 4 weeks and I've been waiting forever to gather enough pictures and form my personal opinion on this product.  Before I get into the details, check out my results!

Personal Photo: Careprost progress
(Photo has been enhance by extra added contrast so the lashes can be seen. My skin does not wrinkle to that extent, maybe in 20 years, my skin will start to look like that so use eye cream people!)

From my results, you can definitely see some growth in the inner and outer corner of my eye. I can also see some growth on my lower lashes but I wasn't able to capture any good photos.  My lashes did not thicken but I can see that it has lengthen. When I curl my lashes now, I have to extend my curler out a couple more times to actually curl all my lashes. The length really shows more when I wear mascara. It was a shame that I didn't take pictures when I had makeup on.

For $10 a bottle, I think it is worth it. I've only use a drop for both eyes, top and bottom lashes being first priority. The excess is then wiped on my eyebrows. I also use just a lip liner brush to apply the product. I've been consistently using in every night and I may have missed a few nights during the 4 week course of this experiment.  

I am still on my first bottle and I expect it to last another 2-3 months. I will continue using this product and provide updates in another 4 weeks. Stay tune!

20 March, 2010

Travel Like a Rockstar on a BUDGET Part I.5

Before I get into booking hotels, I wanted to demonstrate the process of acquiring a rental car.  I am heading to Las Vegas in 5 days and am getting ready to book my rental car. Many of the best place to eat in Las Vegas is off the strip. Without a car rental, I would be paying a lot of money in taxi rides. So here we go, let the bidding war start!

First stop:


The prices are looking pretty steep for Vegas this time of year. Mainly due to March Madness I'm sure. Next Stop - www.betterbidding.com & www.biddingfortravel.com to look at comparable bids.

Betterbidding.com Comparable 
A bid from betterbiding.com


biddingfortravel.com Comparable
List of recent bids from biddingfortravel.com


There weren't many comparable bids that I found to be of help, but it does give me a starting point. So here is my strategy plan:
  1. First Bidding round - Compact for $11.00
  2. Increase vehicle type OR price by $1 dollar.
  3. If I fail after 3 tries. Quit. Start over tomorrow with a different strategy plan.

Update: So my price bidding failed. I end up reserving a car through www.paylesscar.com instead for $91.xx. It was pretty reasonable to what I was bidding on Priceline so I think I came out better in the end. (I HATE you March MADNESS)

07 March, 2010

Travel Like a Rockstar on a BUDGET Part I

One of my splurges in life has always been traveling. Whether it is a trip to a nearby city like Chicago or a trip to Vegas, I like to stretch my money as far as it can go.  With this economy and recession, it pays to do your research ahead of time.  There are few mandatory items that comes to mind when you plan for a trip.
  • Flight/Trip Accommodations
  • Hotel Accommodations
  • Eats
  • Things to do
 Remember this saying. THE INTERNET is YOUR BEST FRIEND. OK, so I didn't have to capitalize that whole sentence because I am sure you already know this by now.  There are a few blog/sites that I frequent everyday and mainly, its to look for deals.  One of my favorite sites that I use to check prices of airline tickets is www.kayak.com  (I am no way endorsing or work for this site so please don't hold me accountable :) )  Kayak is a free websites that makes their profits based on clicks.  In Kayak, you can search multiple airlines at once to see the best price available for your travel dates. There are a few pros and some cons to using Kayak.

Pros:
  • User Friendly
  • Fast
  • Easy to modify search options
  • No additional booking fees!
Cons:
  • Not all airlines participates in Kayak such as Southwest Airlines, Direct Air, Allegiant Air, etc.  
Once I get an idea on the price range, I GO directly to the airline website to book my ticket. I get to play around with the flights and find the time that fits best with my schedule. Many times, the airline website has a better user interface and gives you more flexibility to search for time and dates that fits your time line needs. I tend to look for shortest flights or layovers since I don't want to spend all my vacation time at the airport! The last thing I do before I book that ticket is to look for additional promo code and coupons to apply to it. Often times, Delta, Spirit, and American Airlines may offer some code to make that deal a little sweeter. Again, use google and pray and hope that a coupon is available out there. If you can't find one, at least you tried!

On to the next travel accommodation! I tend to book a rental car on my trips.  Especially when you need some means of getting around visiting the city.  Some vacation spots don't require a rental car. It would be ridiculous to rent a car in NYC unless you are brave enough to battle the crazy drivers there. (Why drive when there is the subway right?)  For car rentals, there are a few sites that I look to before I book the rental car.  For starters, www.carrentals.com is a good place to get an idea what the rates are currently going for.  Majority of my trips, car rentals are booked through www.priceline.com.


Yup, I said it, I use Priceline and bid for my rental cars. Rental cars, in my opinion, are all the same, made by the same manufacturer and are not much different from one rental company to the other.  Moving on, once I determine the price, I visit two other sites to determine what price I should start bidding for.
  1. www.biddingfortravel.com
  2. www.betterbidding.com
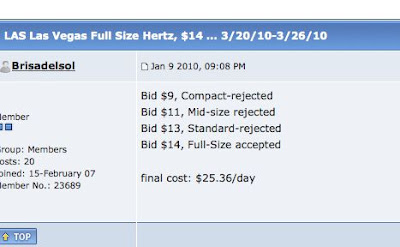
These two forums has real users posting their bidding price and their auction results.  I have use these site many times to get a car rental for my Vegas trips for $11 dollars a day. That's right, a weekend car rental for Vegas would cost me about $45 dollars all inclusive of tax. If you didn't know, a taxi ride in Vegas from your hotel to another hotel could easier cost you $20 - $40 round trip.  Back to the subject at hand, once I get a feel for the starting price of the car rental choice I want to book, I start my bidding at www.priceline.com.  I usually book the economy and compact vehicle and use a price that I feel comfortable with.  If my bid is rejected, I will bump it by $1-2 dollars max.  I may also change the vehicle size on the next bid if I don't want to change my bidding price.  You have three opportunity to bid. If your offer isn't accepted, patience my friend, close your browser and start over the next day.  You could also restart this bid offer if you clear the cache memory in your browser and use a different credit card.  This way, you can increase your price and try the bidding war all over again.

If you were successful in acquiring your airlien tickets and car rental through these suggestions, you are closer to completing your vacation plans! Now pat yourself on the back and wait til the next series of Travel Like a Rockstar on a BUDGET and learn how to get the best price for your hotel accommodation for your trip.

18 February, 2010

Hello & Careprost!

Well hello my fellow blogmates!

It's my first blog entry and I'm so excited to write my first entry! As a computer geek, I spend majority of my days & nights on the computer, along with photography, traveling, make-up, sewing, cooking, eating, and do-it-yourself mentality.  I've been inspired to create my own blog for sometime now since I believe I have a lot of creative juice that I would like to share with everyone.

Why did I pick A Kimmy Of All Trades?  I tried to go with  'A Jane of All Trades' but sadly as it sounds, the blog name was taken before I could get to it.  I thought by personalizing it with my own name, it would make it much more personal.  There are a bizillion ideas going through my head as I am writing this post. I will log those ideas and hopefully share those ideas, experiences, and experiments with you some day soon.

In the next few blog post, I hope to share with you my experience with Carepost (the generic version of Latisse), that claims (no really, proven) to stimulates the growth of eyelashes! I know all you ladies (or men) long for those long luxurious eyelashes. Like me, asian eyes, with short stubby lashes, have always dream of long beautiful lashes. Wait no more my friend, follow me and see the results of this miraculous product transform my eyes and eyebrows! Wanna see a glimpse of the product, see below!

Image by Kimmy. Careprost, Generic version of Latisse.